Pages
▼
Tuesday, March 30, 2010
Always...
The kids are getting anxious as their Spring Break is happening next week and they can't wait! Actually, I think they can't wait for school to be out for the Summer! : ) Me too! That means dh will be home shortly after that!! Whoo hoo!
Today, I created a card with a stamp I picked up at the CHA Supershow in January and I'm happy to have finally inked it up! It's made by American Art Stamps and I just {HEART} it!! It's darling!
I created the card using some fun Jenni Bowlin dp and paper pieced the umbrella with the same dp. I colored in the image using my Copics and popped up the main panel. I used for the sentiment, a word in SU! Fancy Flexible phrases. I needed something rather small as this card I made is small. It's 4.25"x4.25" I love small cards as they are perfect for slipping into a briefcase, on the car dashboard/seat, and lunchboxes.
I popped up the sentiment as well and finished it off by adding some self adhesive crystals to it and the corners of the image. I used my white gel pen to add in some dots around the circle punch out.
Thank you so much for taking the time to peek!! Have a great day!!
Monday, March 29, 2010
So Glad You Did... OCLDT06
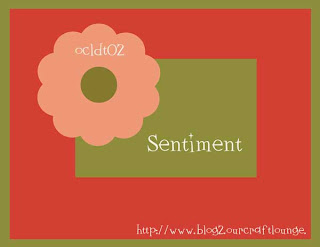
Hi everyone!! Happy Monday! Another week went by (which I still can't find where it went) and a little one contracting a sinus infection. I am happy to be back and share with you Friday's OCL sketch challenge! Here is the sketch:
This is such a great sketch and created by the ever so creative Cindy Lawrence. Check it out and play! You could win some OCL stamps and who doesn't like that??! Check out the deets here.
My card is using OCL's set called Big Thanks.
The dp is K&Co called Citronella and the flower is popped up on the circle punch out. I stamped the flower on the circle and stamped it again, cut it out, and popped it up on first stamped flower. The brackets are flocked using Sparkly Fluff and the sentiment is embossed in white. The inside of the card is finished with the bottom having a cherry strip like the front has and a sentiment stamped inside as well. It says, "but I'm so glad you did!"
I hope you are able to play along and I can't wait to see what you create!! Thanks for stopping by and taking a peek!! Have a great Monday!
Monday, March 22, 2010
A Clear Stamp Storage Idea and Our Craft Lounge Storage Solution
Hi everyone! Happy Monday!! I hope you all had a fantastic weekend! I know I did... Spring greeted us with a very warm day that I sat in that sunshine most of the day with a good friend while the kids played and we got a little suntan!!! Woot! Housework schmousework..... (Honey, if you are reading this, don't worry... kids are fed and clothed with clean clothes....) LOL!!
Today, as promised, I am going to show you my storage solutions for clear stamps, (or in my case My Favorite Things stamps) and Our Craft Lounge stamp sets. My disclaimer: If any of this is old news, I apologize ahead of time, but I have not seen anyone who has these ideas as their systems so I just wanted to share.
First, I will show you how I store my MFT sets. All my photos are unedited and just quick shots of what I did. Please feel free to contact me if you have any questions.
I have so many MFT sets, although probably not nearly as much as some, but enough for me to go crazy in trying to find the right solution in keeping tabs on them all and USE them! I stored them and then forgot about them! So, I thought and researched to see what would work for me. These ideas may not work for all but it does for me and allows me to SEE my MFT sets so I can easily access them; And not spend a fortune on something that may not work. I know some crafters use binders or other solutions, but after seeing what was being commented on those ideas, a lot did not like what they did and are on the hunt for the next storage solution. So, on my hunt, I found this:
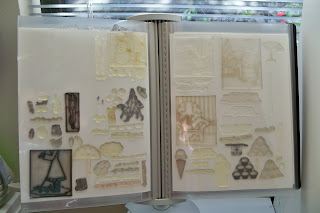
You are thinking, what is that?? Well, this is called a desktop Reference System. You have probably seen these in libraries, offices, schools, etc. You can even find wall mounted ones. They are meant to be used for, well, reference sheets! However, I have found that it makes for a great clear stamp storage! The covers are a very thick plastic that the stamps will stick to and I inserted some white cardstock inside so you are able to see the stamps. This one is made by Fellowes and I purchased it on Amazon for about $25.00. It has 10 pages. You can find more elaborate ones (and expensive ones!) that will expand or are wire edged for durability, but I wanted to be economical in case this was not what I wanted. This particular one is NOT expandable. The base is weighted and you can adjust/tighten the arm and panel piece. The downside to this one? It can get off kilter as it begins to take the weight of all the stamps, BUT! If you keep the pages open to the center, it will maintain its balance and as you look for your stamps, you will be holding the sheets like a book and will be fine. Now, if you are like me, I had a lot of sets in CD cases so I did not have the plastic sheet attached to the stamps any longer. Thats ok! Here are some pictures of what I did: (You can click on them to enlarge it)
The page on the left are some stamps that I had stored in CD cases. I put them directly on the sheet and placed a transparency over it to protect the stamps. Perfect! The page on the right are some I had still attached to the plastic. With that, I added some velcro tabs to the sheet and the set so when I want it, I just pull it from the sheet and use the set! No need to keep pulling anything from inside the sheet pockets!
One side can hold up to about 6 mini MFT sets or about 2-3 full size sets if not attached to the plastic. If still attached to the plastic and is a large set, you can fit about 2 side by side and a mini below it. MFT's set sizes varies so you just have to figure out what you will place on the sheet.
Another view of the stamps....
MFT sets are so versatile that I did not place them in this system with rhyme or reason. However, I did keep a few things together like my ever so loved Pure Innocence line and Flopsey line. But you can always organize better by categorizing your sets. (This does come with tabs you can place in your system)
I still have about 3 blank pages left in this system for more storage of my stamps. It is amazing how much it will hold and everything is at my fingertips for viewing all at once and perhaps, USE them all!! LOL!!
Now, as far as storing OCL stamps...
This may not be a new idea but I can tell you that I have not found a binder in this size with a large ring size- until now!! You have all probably seen those nifty plastic 3-ring cases that can hold sets that Gina K or OCL sells with those cool hard plastic backs. Like this:
However neat these cases are, they can only hold up to about 4-6 sets at a time. If you have a lot of stamps from either company, you are left with MANY of these nifty cases. My solution was this:
I have found a 8.5"x5.5" binder with 2" rings!! Most binders in this size only have 1" rings. I found them at Office Max and they run $7.99 a binder. Not terribly cheap for a binder, but I hope with as much storage I can get out of one, I will not need too many. With this size, I am able to store 12 (maybe 13) clear OCL sets in one binder! I have a seperate binder that will hold my rubber cling OCL sets since these take up more space due to the thickness and can only hold about 8-10 sets. I have not gotten around to altering these binders, but you certainly can to make it personal and fun!
With these binders, I did categorize them for easy use like this:
Well, that about sums up my show and tell!! I hope I have helped a little with some storage solutions for you or at least a place to start! I would love to hear your ideas of storage as I am ALWAYS needing storage ideas for anything!!!
Thanks so much for stopping by and have a fantastic Monday!!!
Friday, March 19, 2010
Dandelion Days- OCLDT05
TGIF everyone! For me, the weekend has started as the kids have the day off today and Spring has greeted us early with some GORGEOUS weather!! It was another crazy day for me yesterday as my son had to go to the ER to have his foot checked out. He had hurt his foot during a basketball game nearly a month ago and he has always dismissed any pain he may have had in result. By yesterday morning he woke up and I found his literally crawling like a baby down the hall. I asked what was wrong and he said he could not walk on his foot. Well! I guess it was time to have it checked out! To add to that craziness, both my boys had a dentist appointment first thing, so we did that first before dropping off one child at school and the other to the hospital. The end result is that my son has a sprain but the DR seemed to think he has rolled his ankles before. The x-rays came out good and she said no running or jumping for 10 days! HA! Did she realize she was saying this to a very active 7 year old boy??!! I thought, yeah sure doc! Baseball season is about to start, so maybe we will see you again! LOL! So, that's my Friday story!!
BUT! It's the Fabulous Friday OCL Sketch today!! Play along for your chance to win some awesome stamps!! Here is the sketch:
My card is using a great set called Dandelion Days. I just love it! Here is my card:
I slightly colored the image with my Copic markers and then added some of my yellow Copic Spica pens on top for added sparkle. The dp I used is by Basic Grey and I finished off the card using some scrap ribbon I had in my scrap bucket. The two main image panels are popped up and the inside is also finished, but of course my mind was not thinking well today and I did not take a picture. It is finished with another strip of black and the Basic Grey dp with the long vine on top. Very similar to the middle panel.
A simple card for a fabulous sketch!! I hope you play along as I would love to see what you all come up with!! Have a fantastic day!
**I will have a clear stamp storage idea to show you soon! I am finishing that up. I will also show you how I store my OCL stamps... I have finally found something that will hold up to 13 clear sets and about 10 rubber cling sets. Stay tuned!**
Tuesday, March 16, 2010
I'm so lucky...
Happy Tuesday!! I am still knee deep in getting my kids room put together. Their new bedroom sets arrived but I have lost some storage space so now I am finding new ways to organize and having to get an additional piece to be able to fit it all in! My biggest headache?? Where to put all these Legos!! They are cool once they are built, but then, you have to put them somewhere right?? I see shelf hanging in my future... One thing you learn while in the military- living in military quarters is not always ideal especially if you don't know where you will be living next or if you will be living in military quarters again. We had our own home prior to living here so we had a lot of adjustments when we moved. This is just another one...
I did make some time to create this card. Another new image from My Favorite Things Pure Innocence line. {{SIGH}} Aren't they just adorable??!! I know I always say that, but they are!! This one is called 4-leaf Clover.
I paper pieced her shirt using Basic Grey's Origins paper, although if I were to do it all over again, a different shade would have been better to help see the shamrock! The main panel is also from the same paper pack and I really wanted to highlight the corner piece of it. I stitched around and popped up the image once colored with Copics. I finished it with a little crochet ribbon and some Prima flowers. The sentiment is stamped directly on the dp. Below is the inside of the card:
I used the same dp as the front and added more of the crocheted ribbon to the top. I CASED Melody's idea of spotlighting something from the main image, in this case, the shamrock which was the only thing I colored in to make it stand out.
Thanks so much for stopping by and peeking! Have a great day!!
Materials Used: MFT-4-leaf Clover, SU! Old Olive, SU!VV, Scrap brown, Momento Black, Basic Grey-Origins, dimensionals, circle punch, Wrights crochet ribbon, Copics, Prima Flowers.
Friday, March 12, 2010
Fabulous Friday Sketch! OCLDT04
TGIF!! The weekend is here! Another week flew by and I am still trying to see where it went! I have been quiet this week due to a child ill in the beginning of the week and the rest was clearing out my kids room for some new furniture they are receiving. Without DH, it makes for a slower process! But it's done and I can get back to "life!"
In the meantime, I have another great OCL sketch to share! Play along and you can win some great stamps!! The deets are on the OCL blog here. Here is the sketch:
Here is my card:
I used OCL's Happy Shopping for this sketch... I just {heart} the table! I stamped the birthdays presents and then masked it to be able to sit on top of the table. I used Basic Grey's dp called Origins which is layered on the bottom panel as well as the top. I was able to use some of my dusty decorative scissors (Postage stamp style) for the top panel and colored in my image using Copic markers. The middle panel and top panel are on diamensions and I used some fun sparkly fibers to run across the middle and some scrap brown ribbon for my bow. I did reverse the sentiment for this card as I didn't seem right having the sentiment below the table.
I did finish the inside of the card to complete the whole look. A great way to use up those scraps!
This is a fun sketch to play with and don't forget to play along!! YOU could be the next winner!!
This about sums it up!! Thanks so much for taking a look and hope you have a fabulous Friday!!
Monday, March 8, 2010
Blog Candy Winner
It's Monday... {insert a big yawn here} but I am ready to get this week started!! I will keep the chit chat to a minimum as I am sure you are interested in who won this morning's Blog Candy!! : )
Ok.... I wrote all your names down in order and used Random to pick your number. The winner is:
GOCANUCKSGO!
Email me your info and I will get your goodies out to you!! Congratulations!! Thank you everyone who left a comment!
I will post again later!! Thanks for stopping by~
Ok.... I wrote all your names down in order and used Random to pick your number. The winner is:
GOCANUCKSGO!
Random Integer Generator
Here are your random numbers:
6
Timestamp: 2010-03-08 12:17:59 UTC
Email me your info and I will get your goodies out to you!! Congratulations!! Thank you everyone who left a comment!
I will post again later!! Thanks for stopping by~
Saturday, March 6, 2010
No Bunny Like You! OCLDT03
Happy Saturday!! I hope you all have nice weather to enjoy this weekend! It is cold here but the sun is shining!! Woot!
I made a card using this weeks OCL sketch challenge below. Come along a play and you can have a chance to win some OCL stamps!! Check out the deets here on their blog. The sketch is below:
Friday, March 5, 2010
New Home Gift Idea-Stamping on Fabric
TGIF!! This week certainly flew by but that's ok. I am looking forward to this weekend as there is no game for my kids to attend!! I hope to sleep in if my kids will let me!
Today I want to show you a simple project stamping and coloring on fabric and the use of your sewing machine. I love this image from OCL's New Digs set and I thought it would make for a cute image on a kitchen towel. Now, this was my very first sewing project so those of you who are sewers, don't look too close!! LOL! But I think it turned out pretty good!
I purchase some basic white kitchen towels at Target and some craft fabric at my lcs. Remnant fabric would work as well. Whatever matches the look you want and are going for. You can find these in the sewing notions area. I also purchased some Marvey Uchida Fabric Markers in a Pastel set and a single black fabric marker for outlining. These markers say they are permanent and should withstand to washing, but I cannot totally vouch for that as I haven't tested it. I did think about using colored permanent markers which I did use on my flowers. It would probably work just the same. Wash and dry the stamping fabric before you begin. I cut to size my printed fabric for the bottom piece. I sewed all the edges and then lined it up to where I wanted this piece to be on the towel. I would have liked it right along the bottom edge, but it's pretty thick and my machine would not penetrate that thickness so I placed it just above that. As I sewed down the center of the fabric I would fold over the fabric to give the "rouching" look. (Is that even the right term?) Once that was completed, I was ready to measure my image fabric and background fabric and start on that. When I started this project, I chose a very light cotton fabric to stamp on and I think if I were to do this again, I would choose something a bit thicker. Once you have cut your fabrics to size, I used my Staz-On ink on my stamp and stamped the white light fabric. I made sure it was a light coverage of ink to be sure it doesn't run in the fabric. Staz-On is not recommended for fabric, but I needed something to use as my outline and knew I was also going over that image with my black fabric marker anyway. I outlined the image and colored it in to match using the pastel set of fabric markers. I quickly went over the entire image and sentiment with my heat gun to set and also let it air dry for a bit before continuing. Once dry, I placed my image fabric in the center of the decorative piece, folding over the edges for a clean look and securing with pins. I then sewed along the edges using the zig zag pattern. When that was complete, I placed the whole piece on the towel where I wanted it and again, folded over the edges securing it with pins. I sewed the edges with the zig zag pattern. Your towel is now complete! There are many things you can do from this point, especially for those of you more advance with sewing. You can embellish it and really make this decorative and fancy. You can personalize it, put initials; make it something special for whom you are giving this to. I finished this project by adding a little slide piece over the towel ready for giving using some cardstock measured to fit all the way around. I then used more sentiments from this set and the small heart as the final touch. Well, I think that sums this up. Thanks so much for taking a look!
Wednesday, March 3, 2010
Single Layer One Sheet Wonder
Hi everyone!! I hope you all are having a good morning so far... we woke up to a dusting of snow on the ground and cold air! Mother nature is not letting up on on the weather this season!
Today I want to show you a card I made using The One Sheet Wonder by Couture Cardstock. This paper is awesome!! It showcased at CHA and when tested, it was an instant winner! It is a heavy cardstock that you can use with your Copics and it will not bleed through. And I mean you can color and color and color, and blend, and blend, and blend! It will not go through! So, I made a single layer card using OCL's Hopping into Spring set, creating a scene using different stamps in the set. I masked the carrots to create two overlaying each other and then randomly placed the other veggies around the pot image. I then completed the scene with the rows of seedlings in the back.
I colored the images with my Copics and when completed, I sponged in the rest of the card using my SU! Ink pads to soften up the white. The picture seems to show the sponged image a bit splotchy, but I assure you that it is smoother when seen IRL. I also figured something else out when using your SU! Inks on this wonderful cardstock. I had made a little mistake when sponging and thought, what can I use to fix this? So, on a chance, I took my white eraser and started erasing... it worked!! I then thought, what will it do it I started "blending" with it throughout the card? That worked too! It took away any harsh spots and lightened up the areas I wanted to lighten. Wonderful!! The sentiment made me giggle, (I laugh a lot....) as I am sure this is true, I would say my boys would smell like dirt first! Boys... I finished the card with a ribbon on top and I was done! Single layer cards is one of my favorite cards to make and using The One Sheet Wonder, I will want to make more!! You can purchase some of this paper at My Favorite Things store. Check it out!
Thanks so much for stopping by and taking a peek!! I appreciate your time!
Materials Used: OCL-Hopping into Spring, One Sheet Wonder, Copics, Momento Black, SU! Inks- Barely Banana, Creamy Caramel, Close to Cocoa, Chocolate Chip, Apricot Appeal, Soft Sky, Unknown Ribbon
Tuesday, March 2, 2010
New Digs!
Happy Tuesday! It's hard to believe that it is still as cold as it is here with Spring around the corner! I am ready for some warm sunshine!! It was an exciting night last night for one of my son's as he lost (finally!) another tooth that has been hanging on for dear life!! This tooth refused to come out and it finally gave in! LOL!! The tooth fairy visited and he was a happy boy this morning!
Today I wanted to share with you a suspension card using one of OCL's CHA releases called New Digs. This is such a fun set and perfect for when you move or for someone you know who is moving. I thought it would be neat to suspend the sign in this card. I am not totally crazy with this layout but it works. You can find the instructions on how to make a suspension card here on SCS.
The bottom picture is a close up to the suspension.
I guess that sums it up for now!! Thanks a bunch for stopping by and peeking! Don't forget to leave a comment here for your chance to win some Blog Candy that included a new OCL stamp set. And you can win more at OCL's Blog doing the sketch challenge. You can find that sketch here.
Have a fantastic day!
Materials Used: OCL-New Digs, SU! Bashful Blue ink, SU! Tango Tangerine, Nikki Sivils dp, SU! Kraft, Spellbinders, Primas, small brad, Copics, SU! Oval punch, Momento ink, dimensionals, Georgia Pacific cs
Monday, March 1, 2010
I Practically MADE money on it! OCLDT02 (2nd Post)
Hello again everyone!! I am posting again today as I have a fabulous OCL sketch to share with you! First off, if you miss the Blog Candy post or want to read that post, visit it here.
If you want another chance to win some fun OCL stamps, play along with this sketch and be sure to visit their blog for posting instructions! Here is the sketch:
And here is my card:
I love sketches and this was a great one. This set is from one of OCL's CHA releases called Happy Shopping. Awesome set! So fun and funny (to me at least!) because it reminds me of what my sister and I would say when we would find some great deals. Although, we would say, "I'd be LOSING money!" LOL!! Anyway, I followed the sketch and added the image into the center of the fabric flower. I faux stitched around the card (because I still haven't threaded my new machine...) and added some bling to the corner. I used my Copic Spica pen to go over the sale tag off the sentiment and colored in the image with my Copic Markers. The sentiment panel and flower are popped up and I finished it off with ribbon.
I hope you can play along for your chance to win some great goodies!! Thanks for stopping by and taking a peek!!
Materials Used: OCL-Happy Shopping, SU! Confetti Cream cs, Cosmo Cricket dp, scrap yellow and blue cs, Momento black, Copics, Copic Spica-Clear, ribbon, self adhesive crystals.
News and Blog Candy!
Happy March everyone!!! I can't believe that Spring is just around the corner, but I will tell you that I am not complaining! : ) I am ready for some warmer weather!
I mentioned before that I had some pretty exciting news (for me at least!) that I was going to share today. No beating around the bush... here it is:
I have been asked to be one of 3 Guest Designers for Our Craft Lounge!! I am such a huge OCL fan that I was floored to have been asked and I am still waiting to be pinched!! LOL!! I am honored to be part of their highly talented group... I am looking forward to working with them all over the next few months! The other gals chosen are Vicki Garrett and Terri Thill! Such talented girls-check them out!
All you have to do is leave a comment and I will pick a random winner next Monday morning! Subscribers will receive an extra chance!! Good Luck and pass it on!!
Have a great Monday!!
I mentioned before that I had some pretty exciting news (for me at least!) that I was going to share today. No beating around the bush... here it is:
I have been asked to be one of 3 Guest Designers for Our Craft Lounge!! I am such a huge OCL fan that I was floored to have been asked and I am still waiting to be pinched!! LOL!! I am honored to be part of their highly talented group... I am looking forward to working with them all over the next few months! The other gals chosen are Vicki Garrett and Terri Thill! Such talented girls-check them out!
In celebration of this news, I am offering up some Blog Candy! You will receive:
~OCL's Valentine Release of Jungle Love (to arrive directly from OCL via mail)
~Kimberly Watercolor Pencils
~A Sample of Copic Markers
~Sakura Glaze Pen
~Fabric Tags
~OCL's Sparkly Fluff in Cotton Candy
All you have to do is leave a comment and I will pick a random winner next Monday morning! Subscribers will receive an extra chance!! Good Luck and pass it on!!
Have a great Monday!!